You want to start a blog but feel overwhelmed.
You’ve read countless articles and done a ton of research.
Everything you learn leads to more and more questions…
What to focus on? Where to even begin?
You feel like you’re failing before you even get started!
But what if we told you:
It doesn’t have to be so difficult…
The key to any difficult or ambitious goal is to break it down into smaller, easier steps. And this is true of starting a money-making blog.
In the following guide, we’re going to show you how to overcome the overwhelm. We’ll follow a proven, step-by step blueprint for starting a profitable blog – and in less time than you’d think.
Join us as we start our journey with the all-important first step: understanding your WHY!
Why you should cancel Netflix and start blogging RIGHT NOW
It might be difficult to pinpoint why we’re helplessly addicted to binge-watching. Fortunately, the reasons for starting a blog are much clearer!
Blogging can be an incredibly rewarding experience personally, professionally and financially. Here are some of the best reasons you should get started today:
Do any of these reasons resonate with you? Do you know your own why(s)?
If so, let’s pull the curtains back a little further. Let’s see what it actually takes to start a blog.
Zero to blog: How to hit the ground running
The following is an overview of the topics we’ll cover in this guide. Each section is organized in a way that shows you the exact steps to follow to reach your goal.
Complete each section and your new blog will be up and running in no time!
- Decide what to blog about
- Come up with a domain name
- Choose your blogging platform
- Find a web host
- Install WordPress
- Make your first blog post
Step 1:
Decide What to Blog About

If you already have a topic in mind, that’s great! However, we still recommend reading this section to make sure it’s your BEST possible topic.
There are many ways to get stuck. Let’s avoid all of them!
Picking your blogging topic seems like it should be simple yet so many people get stuck here. We’re talking days, weeks, or longer. Some people never make it beyond this point because of analysis paralysis.
What helps is thinking about this process like a relationship. You aren’t getting married to your topic. Instead, it’s a date. If after several months you realize it’s not right for you, you can change things up by pivoting or choosing another topic. No worries.
So with that in mind, let’s get started!
The wrong way to pick a niche
If you’ve read other guides on starting a blog, you’ve probably noticed a lot of the same advice. It goes something like this: pick the topic you’re passionate about, an expert in, and then target a specific demographic.
This is actually bad advice for a beginner.
Here’s why:
Passion. A topic you’re passionate about doesn’t always translate well into a business. For example, we’re passionate about eating pizza and watching movies. Solid biz foundation? Probably not.
Also, a lot of people don’t even know what they’re truly passionate about.
Instead, let your interests guide you… and success will create passion.
Success creates passion more than passion creates success. Scott Adams, creator of the Dilbert comic strip
Expert status. You do not have to be an expert. To repeat, you do NOT have to be an expert.
You just have to know enough to help someone behind you. Given time, you’ll be able to help even more people and eventually become an expert.
There are countless, successful bloggers out there who were new to their topic when they started. More on this below.
Highly specific demographic. When you’re first starting off, you want to do quite the opposite. You want to cast a wide net. Things are going to be awkward in the beginning. You’ll fumble around a bit. It’ll take some time to understand your audience and their needs.
In other words, it’s hard to know exactly where this blogging thing is going to end up, so you want to be careful not to pigeonhole yourself.
By going wide at the start, you have room to play and explore different areas underneath that broader topic. Once you get a better understanding of your audience – and what you’re enjoying – you can then get more specific (if you choose).
There will always be exceptions. The passion + expert + demographic formula can and sometimes does work. If you find that it fits you, go for it! However, be sure to read the section below for other considerations.
The secret to picking a profit-guaranteed niche
Here’s how to set yourself up for success and start making money sooner versus later:
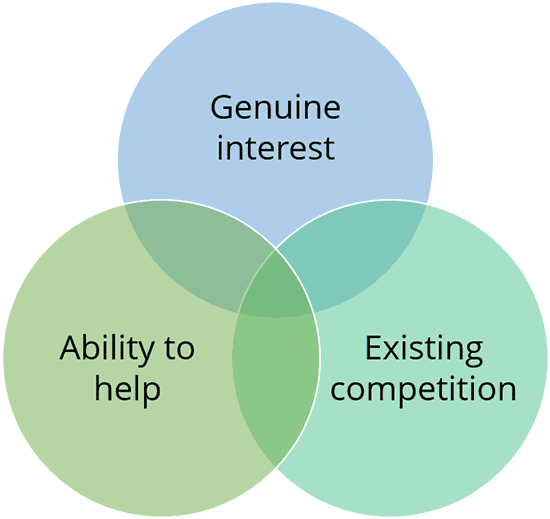
1. Genuine interest. Is this a topic you can enjoy? Do you have any interest in it at all?
As a blogger, you’ll be writing within your topic for many years to come. If you really hate this niche, you’re going to make yourself miserable.
Also, if every post is like pulling teeth, it’ll show in your writing. Your readers will sense this – and they will certainly not come back to read more.
2. Ability to help. Can you help people with this?
You don’t need to be an expert. You DO need to be able to help solve your audiences’ problems – to some degree.
If you are starting new in this niche, helping people can be as simple as sharing your journey, the things that you are learning and anything you wish you’d known at the start.
If you do have some experience in this niche, then you’ll have many more options in how you can help others.
But in the beginning, it’s only necessary to be able to help someone who is a few steps behind you.
3. Existing competition. Is there competition? Are there already a lot of blogs on this topic? If so, then good news!
One of the best indicators of a strong, healthy market is competition. Why? Because a competitive niche is a proven money maker. If you are seeing a lot of competition, it almost always means there’s a lot of money to be made.
If you see little competition, you can still find success but it will probably take longer. Our advice to you: if you don’t see a lot of competition in this niche, you had better do some research and figure out why.
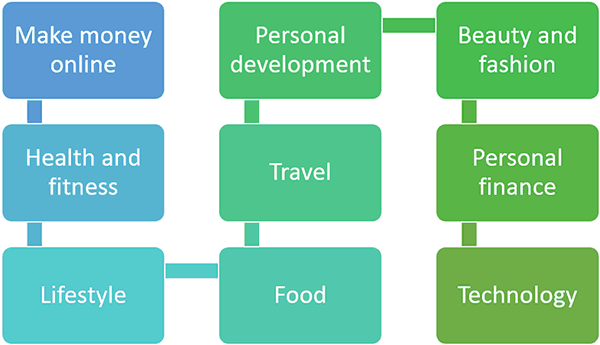
The 8 proven niches that can increase your chances of success
If you are looking to profit from your blog as quickly as possible, these are the niches we recommend exploring. Each has massive audiences with a proven track record for spending money.
Any niche has the potential to be profitable, but these 8 topics will get you there in the shortest amount of time:
Step 2:
Come up with a Domain Name
Congratulations! Now that you know your blog’s niche, it’s time to pick your domain name!
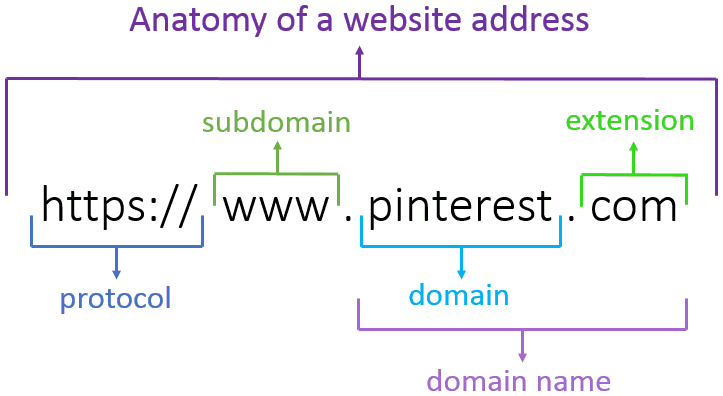
Your domain name is like your street address. It’s how people know where to find your home.
Choosing your domain name is another one of those beginner traps. Many will struggle and spend countless hours agonizing over the perfect domain name.
But here’s a secret we want to let you in on:
It’s not as important as you think!
Now don’t get us wrong. You shouldn’t just use any crappy name you think of on a whim.
But consider this. In the blogging world, there are a lot of things you can get wrong and still find success.
The two exceptions:
- understanding your audience and
- producing great content.
Get those right and you’ll be light-years ahead of the competition!
So back to the brainstorming…
If you are wanting to brand yourself as an expert in the future, you can consider using your name as the domain. This only works if your name is easy to spell, unique enough and available.

What kind of value will you offer your audience? What makes it unique? What kind of feeling or imagery do you want to conjure? If you had to describe your blog in just a few words, what would they be?
Write these words down and then play around with combining them in different ways. Your domain name should give your audience some idea of what your blog is about in a short, memorable way.
How to make your domain memorable – for the RIGHT reasons
Things to DO:
Things to AVOID:
OK, so you’ve brainstormed some domain name ideas. Now what?
Claim your domain, before someone else does!
Death and taxes are said to be the only two things certain in life. We would add a third item to this list:
Your domain name is taken already.
OK, that might be a little dramatic but it’s possibly true. To date, over 330 million domains have been registered. Read that number again:
Three hundred, thirty… MILLION.
If those were stacks of dollar bills, it’d reach over 20-miles high!
So, if your first handful of domain names are already taken, do not fret. It’s just part of the process. Limitations breed creativity. Let this be an opportunity to come up with something even more unique or memorable.
You can use the widget below to easily check whether your domain name is available:
If your domain is available, get a head start and click ORDER NOW. This will take you to our recommended host (spoiler alert: it’s SiteGround) with our preferred plan pre-selected. We also cover this in greater detail in Step 4 below.
Step 3:
Choose Your Blogging Platform
Your blogging platform is the software that runs your website. Using our home analogy, it’s like your type of housing – apartment, condo, duplex etc.
Each has their pros and cons. But in the world of blogging, there really is one platform that stands above the rest:
WordPress!
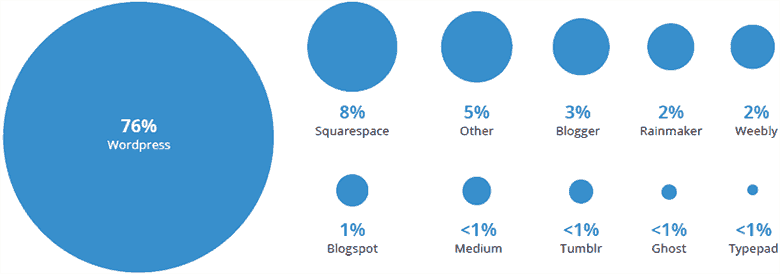
About 30% of websites on Earth now run WordPress. Think about that for a second…
That’s a crazy amount of websites!
And that number more than doubles when talking about just blogging platforms:
It’s not by accident that WordPress has grown so quickly in popularity (and continues to). Here are just some of the reasons we’ve used it for the past 11 years and recommend it:
When you choose to use WordPress as your blogging platform, you have the choice of two options: hosted versus self-hosted.
WordPress.com is the free, hosted as a service option. We don’t recommend this version because of severe limitations on customization, monetizing and SEO. It’s a backstep away from those benefits listed above.
WordPress.org, on the other hand, is the flagship, self-hosted option that we’ll be talking about in this guide. Being self-hosted means you’ll have to pay a company to host the software for you (more on that below). However, it’s absolutely worth it because of the level of control you gain as well as the income potential.
You’ve made it this far! Awesome job. Let’s keep the momentum going!
Here’s a recap of your progress:
The next step is to figure out where to build our home.
Step 4:
Find a Web Host
If you wanted, you could download the WordPress software and install the blog onto your own computer. The problem is… the rest of the world won’t be able to see it. This is why we need a web host company. They make your blog visible to the world.
Your hosting company is like your landlord. You pay them rent so your blog can live on one of their computers. They take care of all the technical hardware stuff so you can focus on blogging!
A web host typically costs in the $10-15/month range.
You can get a huge discount if you pay for your first year in advance. This can bring your per month cost down as low as just $4/month.
If you think about the high costs involved with starting a traditional brick and mortar type business, then you really begin to see how inexpensive starting an online business is.
There are few legitimate businesses out there that could be started for less than a couple hundred bucks. Let alone have the same full-time income earning potential as blogging!
The most important factors when considering a web host
When shopping for a web host, here are the most important things to look for:
Your web host is the foundation of your blog – of your business. Give yourself the best chances at success by using a company with a solid reputation and established track records. Which leads to the next section:
Our hosting recommendation
We’ve bounced around from a number of web hosts over the years, including… 1&1, DreamHost, FatCow, GoDaddy, HostMonster, HostGator, NameCheap, ServInt, Cloudways, our own hosting server, a long list of free web hosts, and probably some others we’re forgetting.
But the host we’ve grown to love and recommend to friends and family? That slot goes to SiteGround. Not only do we recommend them, but we also use them for ALL our websites today
Let’s look at SiteGround’s highlight reel and see why.
Like a good book, you can’t judge a web host by its cover
SiteGround may appear ordinary and unassuming at first glance, but make no mistake – there’s a lot of power under that hood. Their servers are optimized specifically for WordPress which makes them fast and primed for your blog – right from the start!
Their customer support is fast and knowledgeable too. Chat, phone and support tickets are available at all hours meaning you can rest assured – there’s someone around at 2:31 am to help you out.
Other reasons SiteGround is a no-brainer:
SiteGround has been in the hosting business for 14-years… which is an eternity on the internet. This sort of thing doesn’t happen by accident. There’s a pretty long list of web hosting companies that popped up, provided a lousy service and went out of business shortly afterward.
You can feel confident that SiteGround’s experience level and state of the art equipment will take care of your hosting needs, freeing your mind to focus on developing your blogging business instead. This is how it should be!
How to get started with SiteGround
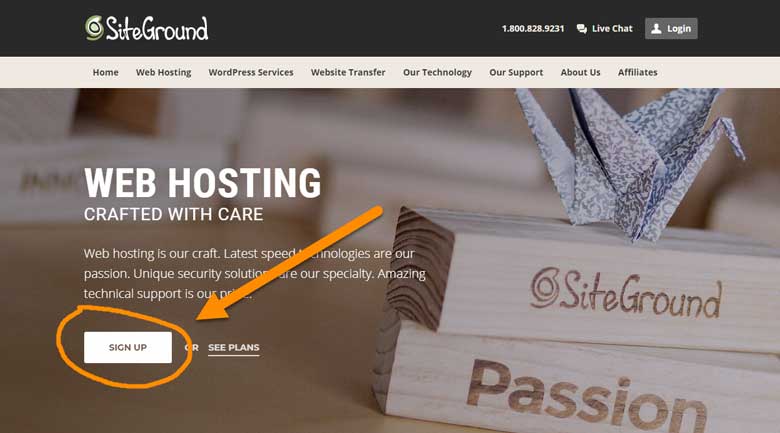
Click here to go to SiteGround and start your blog! (The link will open in a new window).
The link above will save you 65% or more on SiteGround hosting. This is their best promotion for 2019 and is automatically applied to your order.
Once the SiteGround page opens, click SIGN UP.
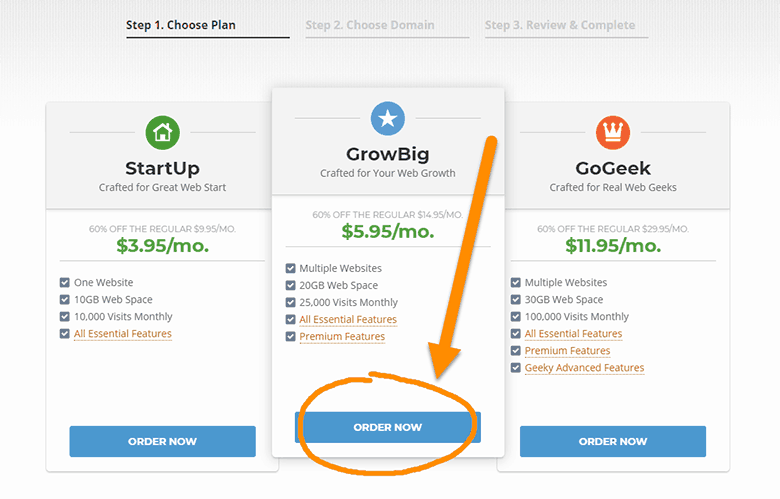
Next, choose a plan. For beginners, we recommend either the StartUp or GrowBig plans. The two plans are quite similar with a few exceptions.
In particular, the starter plan allows only one website. Also, things like transferring your website and restoring from a backup are paid services (but free with GrowBig).
We went with the GrowBig plan primarily because we host multiple websites.
You can always upgrade your plan later but you’ll get the biggest discount on your initial order. If you might want multiple blogs in the near future, consider purchasing the GrowBig plan now.
Click ORDER NOW.
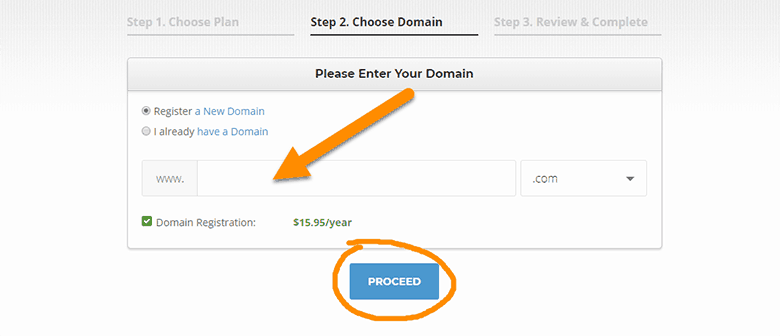
Earlier in this guide, you came up with a domain name. Enter this domain name in the blank field. Make sure you’ve selected the right extension (.com, .co or .net).
If you already have a domain name (registered with a different company), click the “I already have a Domain” option and enter your existing domain name.
Click PROCEED to continue.
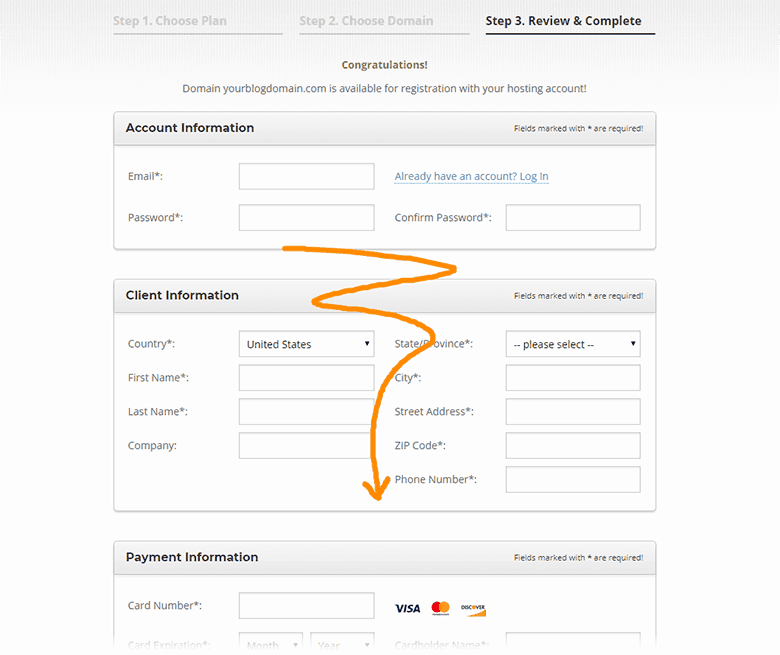
Continue the account setup by entering your personal information and payment details. Continue down the screen…
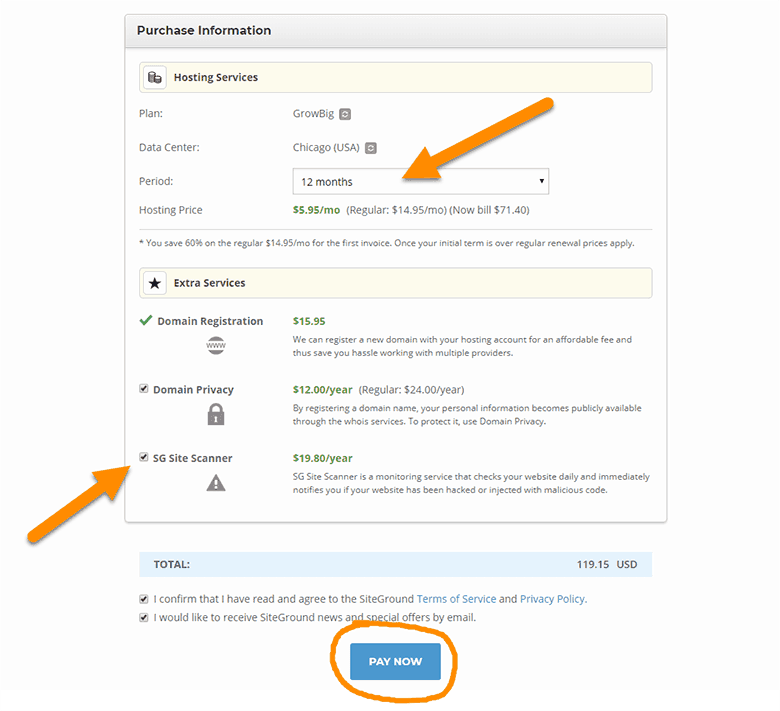
In the Purchase Information section, there’s a few fields to clarify…
Period: SiteGround gives you a pretty nice discount on your initial 12-month order. Afterward, you’ll be billed on a monthly basis at their regular price. You can, however, extend this discount up to 36-months (your first three years) by changing the Period for this initial order.
Domain Privacy: Every domain has a public record that shows who owns it and how to contact them. This opens the door to unwanted solicitations, spam and even identity theft. Domain Privacy is SiteGround’s service that will keep your personal information private and unavailable to the public. We highly recommend it!
SG Site Scanner: Keeping your websites up and running is one of SiteGround’s priorities. The SG Site Scanner will monitor your account daily and check it for being hacked, infected with malware and domain blacklisting. If you want extra peace of mind, it’s worth considering at less than $2/month.
After reviewing your options, click PAY NOW.
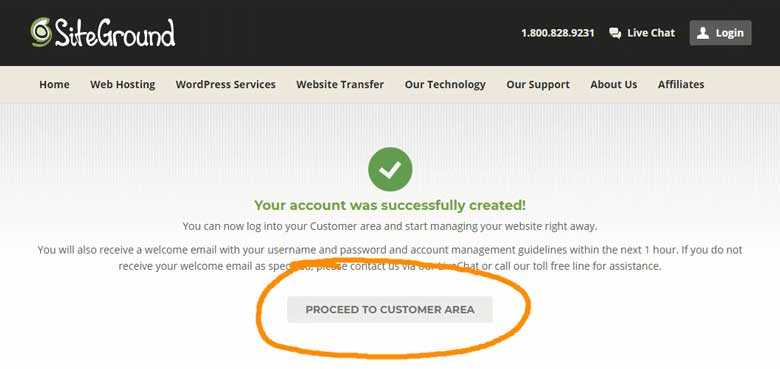
Congratulations! You’ve just created your hosting account!
In the next section, we’ll walk you through installing WordPress. Don’t worry – SiteGround makes this super quick and easy. To get started, click PROCEED TO CUSTOMER AREA.
Step 5:
Install WordPress
Once upon a time… setting up a WordPress blog required: downloading the software, extracting it on your server, setting file permissions, creating a database and users, making some code changes and then tying it all together using an installation script.
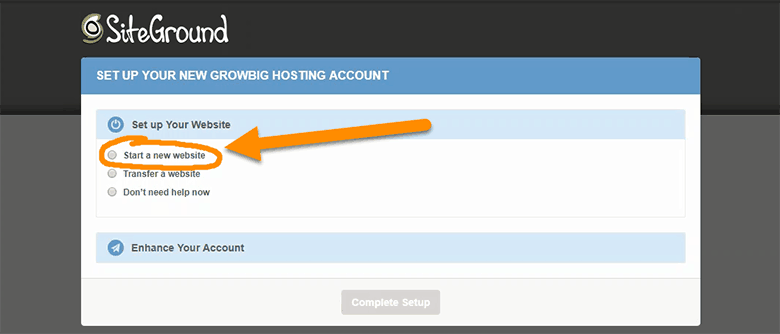
As you’ll soon see, the process is much more streamlined with SiteGround. Continuing from where we left off above – click Start a new website.
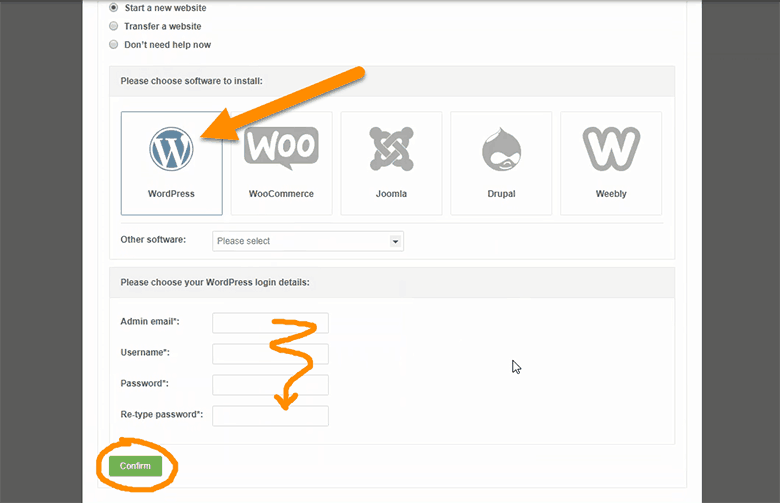
Next, click on WordPress and fill out your login details. Be sure to write these down because you’ll need them again when logging into your new WordPress website.
Click CONFIRM.
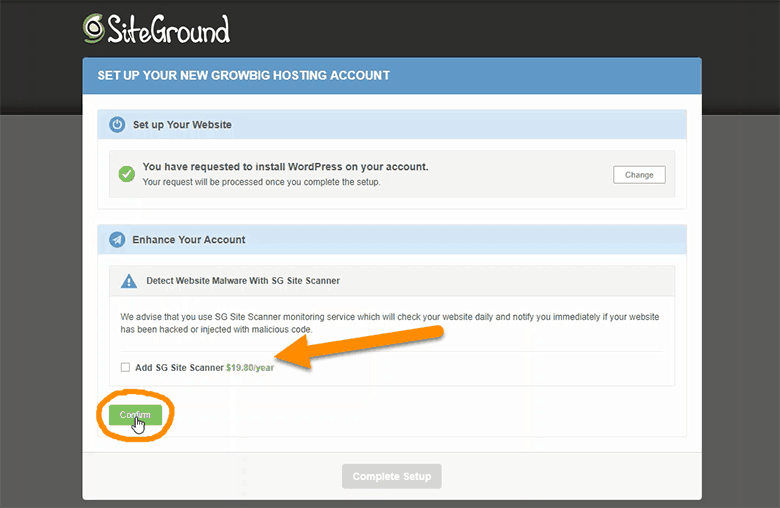
If you didn’t select any account enhancements (such as SG Site Scanner), they’ll give you another chance to choose it. Check it or leave it unchecked – and then click CONFIRM.
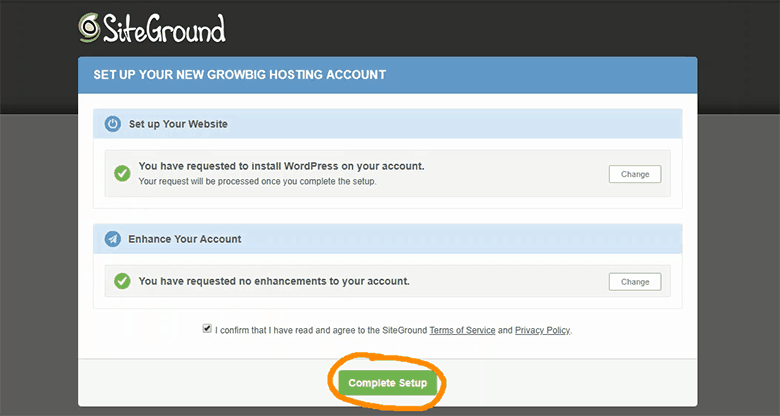
The final step is to click COMPETE SETUP.
Your account setup is complete and WordPress has been installed! Great job!!
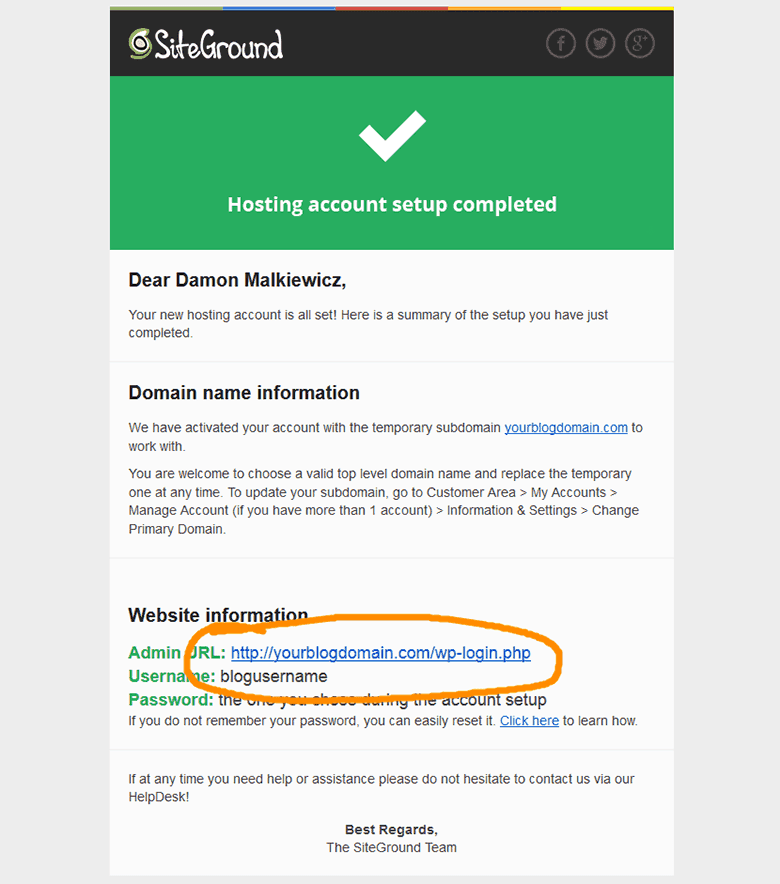
You should receive a setup confirmation email from SiteGround. It’ll have your website login details, including the Admin URL and username (that you came up with above). Keep this info nearby because you’ll use this when logging into your website.
With WordPress, your Admin URL is always your domain name + ”wp-login.php”. We recommend bookmarking this address so you don’t have to type it each time.
Step 6:
Make Your First Blog Post
You’ve got a blog now! How awesome is that?
Granted, there’s not a lot to see at the moment. But that’s easy enough to fix! In this section, we’ll make your new home look a little more inviting by making your first blog post!
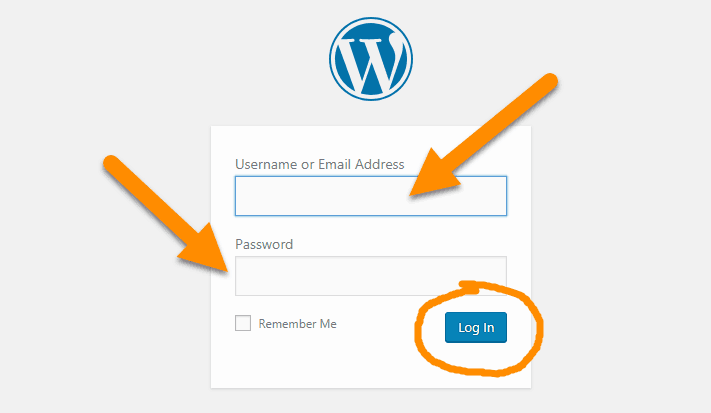
To start, go to your Admin URL (from previous step). You should see a login prompt like below. Enter your login details and click Log In.
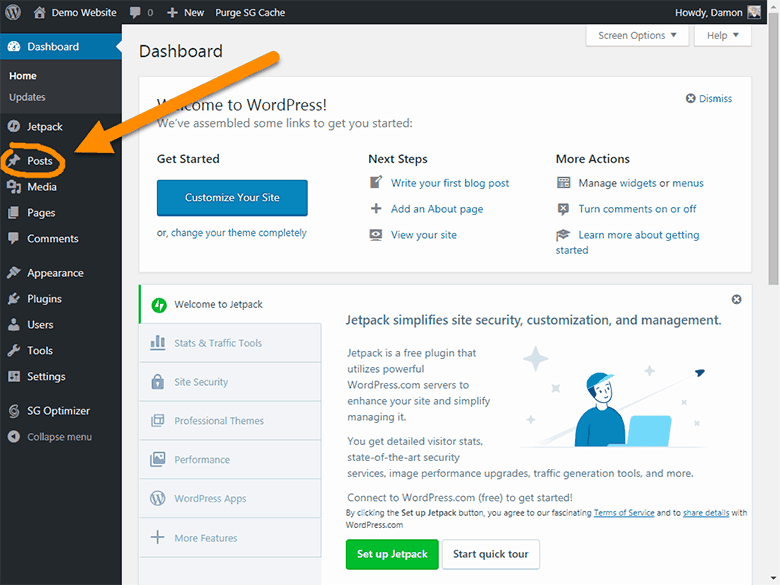
After logging in, you’ll see your WordPress dashboard. It should look something like the following picture.
There’s a lot to look at on this screen. Don’t let it intimidate you! At the beginning here, we’ll just focus on what’s necessary for hitting your goal – making that first post. The rest can be learned over time.
Click on Posts.
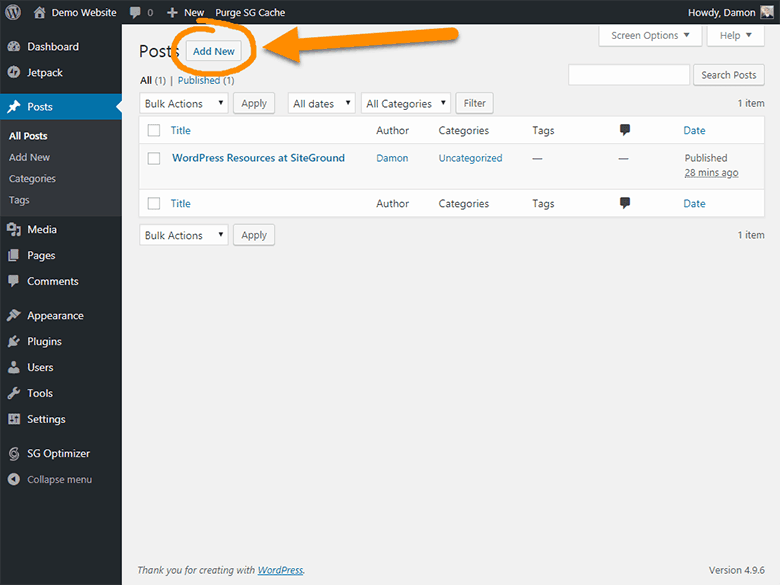
This is your Posts view. This is where you will come to add, edit or delete your blog posts. SiteGround creates a resources post during setup, so it’s normal to see something already here.
Click Add New.
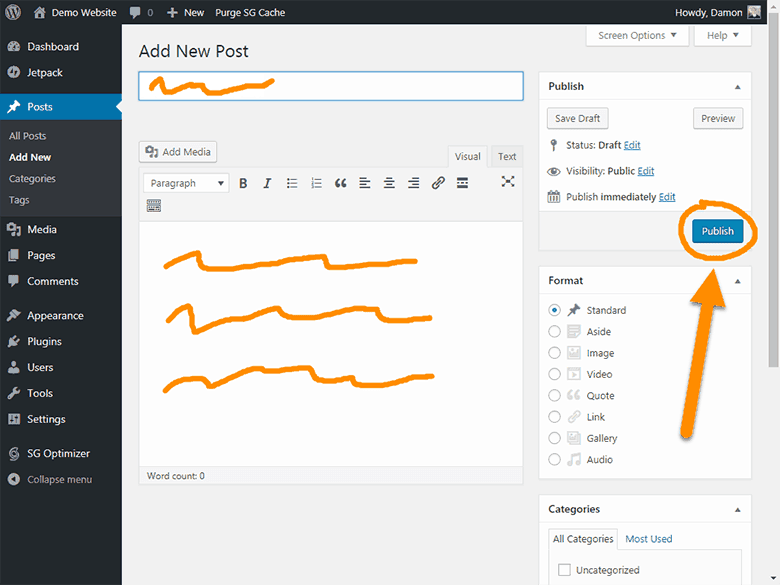
This is where you will create your actual blog post. There’s some strategy to crafting a great blog post but that’s outside the scope of this article.
For now, keep things simple and write something brief. For example, you could write an introduction. Let people know why you created this blog and what they can expect in the near future. Remember, this is just an exercise and you can always delete this post later.
Afterwards, click Publish.
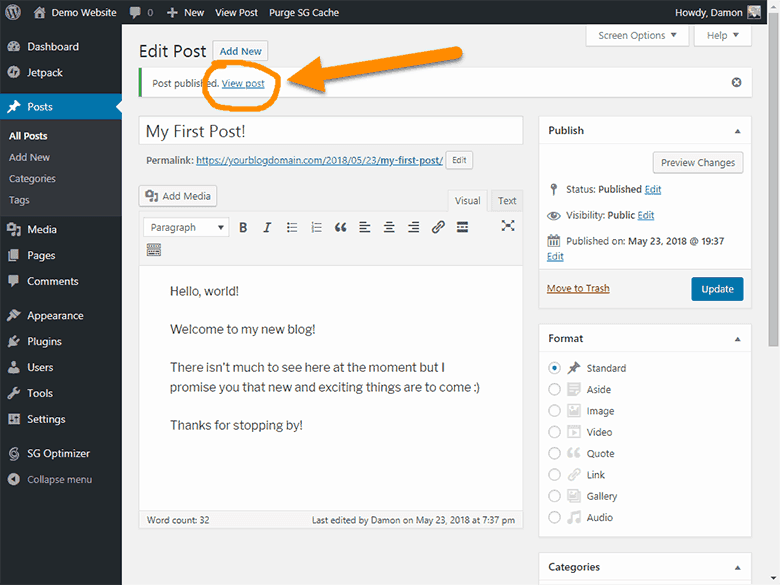
Easy peasy, right? You just published your first blog post for the world to see!
To see what it looks like, click the View post link.
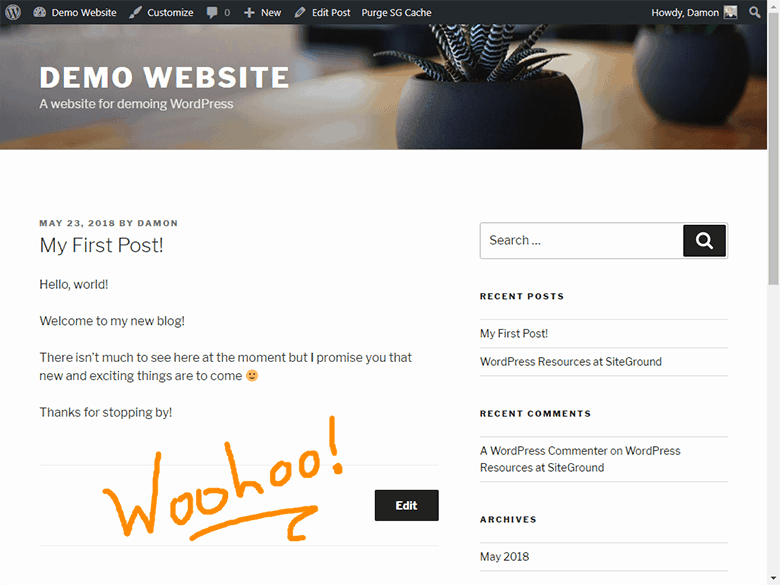
Your finished product!
Wrap Up
If you’ve made it this far, then seriously… WELL DONE! You’ve just taken a huge step towards becoming your own boss, crafting your ideal life and starting your online business!
You rock!!
Give yourself a pat on the back and take a break.
When you come back, we’ll continue with Part 2 in this series on setting up a blog. Here we’ll walk you through 8 essential steps in configuring and customizing your new blog.
This is where things start to get fun. We promise – you won’t want to miss it!
Next Steps
We’re glad you took the time to read through this guide. The most important next step is to take action!
If you found anything in this guide helpful, we ask one thing of you: please PIN THIS or share it with a friend. It helps us and it helps them. Everyone wins! 🙂
Once again, we hope you learned a lot from this how-to guide. Feel free to let us know if you have any questions. Just post them in the comments below.
We want to help. Leave a comment, let us know where you’re struggling.
